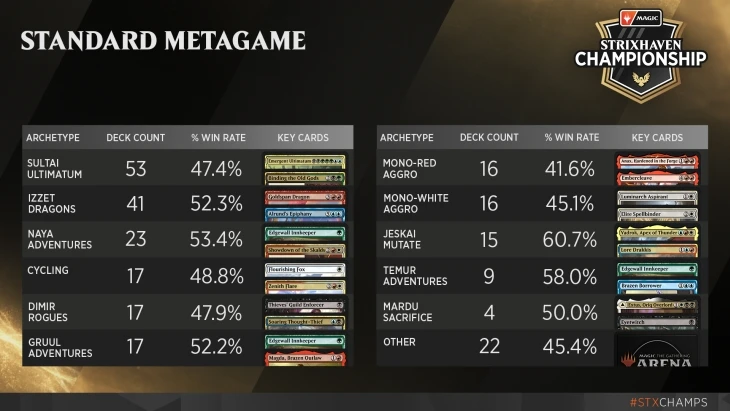
One of the main storylines of last weekend's Strixhaven Championship turned out to be
Although I was watching the event from the sidelines, the deck's success didn't surprise me as much. Fortunately for me, I have some contact within the team that brought the deck, which consists of not only the two Top 8 competitors Matti Kuisma and David Inglis but also Kaldheim champion Arne Huschenbeth. While I didn't influence the deck selection, I did do some dedicated matchup testing with Tristan Wylde-LaRue (Tristan_MTG) who finished the Championship with a requalification through a 10-5 record. And fortunately for you and me, he provided me with a lot of information that I brought into form for this article for you to digest.
The List
| Matti Kuisma's Jeskai Mutate | ||
|---|---|---|
| Main Deck | Sideboard | |
|
|
|
The Basics
Although this is a combo deck in nature and does contain some infinite loops, due to the timer system you'll seldom get to go full combo on your opponents if you play it on Arena. Don't be disappointed when you watch replays from the weekend. The combo aspect will be far more relevant in paper matches.
The Combo
If you have a
Assuming you already have Lore Drakkis and Vadrok mutated onto your Dragon and have sufficient mana, meaning eight starting mana, you cast Prismari Command, dealing 2 damage to Goldspan Dragon and creating a Treasure, which comes out to two Treasure tokens in total. You cast Unsubstantiate on your Goldspan Dragon, returning the full mutate pile to your hand. This part nets one mana, as the two spells cost five, but you earned enough Treasure for six mana in the process.


The Loop:
-
Recast
for five mana. (You're down five mana.) -
Mutate
for four mana and cast free from graveyard, targeting Dragon and creating Treasure. The Dragon ability triggers twice for a total of three Treasure tokens. (Sacrificing them means you go up two mana on this step and are down by three in total now.) - Mutate
, trigger Dragon ability, get and sacrifice Treasure. (Still down by three mana.) Resolve Drakkis trigger first to return to your hand. Resolve Vadrok trigger to recast free Prismari Command with the same modes, trigger Dragon ability, get and sacrifice Treasure. (Down by one mana.) Cast Unsubstantiate in response to the Command to return Vadrok/Dragon/Drakkis to your hand, trigger Dragon ability, get and sacrifice Treasure. (You're still down by one mana but get an additional Treasure when the Command resolves, which you can sacrifice for two mana during the next iteration of the loop.)
This loop generates one extra mana per iteration, so on every third iteration, you can replace one Command mode with "deal 2 damage to your opponent" once. In real-life tournaments you only need to demonstrate this process and then declare you're repeating it ten times to deal 20 damage to your opponent. On MTG Arena, however, you need to perform every action every time, and there's an upper limit for how much time you can take in a single turn (six minutes plus extensions of 30 seconds each).
So you'll seldom be able to use the combo to it's fullest on Arena. Also note that you'll need to go into full control mode, both for sacrificing Treasure while Goldspan Dragon is on the battlefield and for responding to your second Prismari Command with Unsubstantiate. The combo gets easier and faster if you have additional mutate creatures that make the loops produce more mana/triggers/free spells/cards per iteration. Nonetheless it's often a good idea instead to unsubstantiate everything your opponent has in play and end your turn with a bunch of mana and multiple copies of Unsubstantiate in hand to stop your opponent from redeploying, simply because this is so much easier on the clock.
Also note, while eight or nine mana to start the combo (depending on where exactly you start) may seem like a lot, you can usually acquire some extra mana before going for the actual loop. You'll typically put some mutate creatures onto your Dragon beforehand, target it with some
The Tricks
-
Casting
to force through is generally good because you get to bring it back immediately. -
Look to use
to bounce your own in response to removal. If you have Lore Drakkis on it, it's almost always better to unsubstantiate your Dragon than to negate their removal spell. -
You don't always have to mutate onto your Dragon right away. This comes up especially often in game one when your opponents don't have a ton of
and other removal. It can be better to wait until you untap so you have more mana to protect it or so you can put better cards in your graveyard. If you have a Negate and a Lore Drakkis in your hand and you think Negate is a strong card in the matchup, it might be worth waiting so that you can use Lore Drakkis to get back the Negate. -
Be cautious bringing back
with Lore Drakkis. You'd often rather have a it in your graveyard than in your hand. It's the best value target for the trigger and it can be difficult to find the time to cast it from hand. -
Postboard, if you've trimmed or cut
, you need to be careful with your mutations. Be a little more patient with your usage of them. You can definitely still get outvalued even if you're getting a bunch of value out of Drakkis and Vadrok.
The Matchups
Naya
This matchup is good for you. The key to this matchup is to make sure their
-
In game one Stomp, Giant Killer, and
are typically their only removal spells. You can mutate above your Goldspan Dragon to dodge Giant Killer. -
Vadrok is close to indestructible in game one and blocks a ton of their stuff. I'm not very likely to mulligan a functioning hand that can cast Vadrok on turn three.
-
It's hard for you to catch up in game one and this is the main way you lose. As a result, you should mulligan hands with bad mana or no early interaction.
-
Sometimes the Naya deck has trouble curving out and can get clogged on threes and fourss. If your opponent is playing a three-drop on turn four and passes, you can be aggressive with Unsubstantiate to keep them bottlenecked on mana.
| Sideboarding | |
|---|---|
| bring in | take out |
|
|
They're likely to board in removal like
Cycling
Cycling is a deck that can follow many different game plans, which makes the matchup somewhat difficult. Sometimes they try to grind you out with
-
They are almost always short on interaction in game one. The most they have main is usually up to two
and/or up to two . Because of that you should be playing your Dragons early and aggressively, meaning, if you have a chance for a turn four Dragon, you should likely take it. -
You need to be careful about Zenith Flare, if possible hold a
for it. Be careful that they can flare you with a trigger on the stack if you tap too low. -
In postboard games you often have to play more patiently since they have a lot of outs to a resolved Dragon. They're likely going to have cards like Redcap Melee or Shredded Sails as well as more counterspells.
-
In the postboard games especially, your Dragon is almost always going to trade for their Disdainful Stroke. Unless they're aggroing you out with Fox, they'll almost always leave mana up and you can't really afford to cast Dragon plus Negate because you risk getting double flared. Eventually you just have to bite the bullet and start trading five-mana Dragons for their two-mana counterspells. It sucks, but sometimes they'll also not have it or they'll flood out on Strokes when you don't have Dragon.
-
Dragon is your only card that gets stroked, so there are a lot of hands where you don't ever actually have to cast it or you can loot them away to Seize the Spoils—but if you do this you have to be confident you're never going to cast a Dragon since their Strokes will never leave their hand.
| Sideboarding | |
|---|---|
| bring in | take out |
|
|
Whether you want Redcap Melee or not depends on if they keep
Monored
You're firmly the control deck in this matchup and a little ahead. Your combo stuff is mostly to provide card advantage. Vadrok is a good blocker, but awkward against
The Dragons aren't as good in this matchup and can sometimes be clunky, especially if we know they have Redcap Melee. They're hard to protect and aren't good blockers. Eventually they let you pressure your opponent, but usually the games are won on card advantage through looping removal spells. The best thing Dragon does is to serve as a mutate target that dodges Frost Bite.
-
You should default to casting your spells at the beginning of combat unless you have a strong reason to do otherwise. It's very easy to get punished by
if you wait until later, and does that automatically. -
On the flip side, the only reason to mainphase removal is if they're tapped out and (a) you have Dragon and casting
on their turn might let Frost Bite kill it or (b) you are casting Fire Prophecy and worry about them killing their own creature to fizzle it. -
lets and deal with Goldspan Dragon. -
Vadrok dies blocking
if they have Bonecrusher Giant in hand. -
has reach. -
They can't mutate creatures that the Robber stole onto their own creatures. In spite of what the reminder text says, mutate actually requires the mutating spell and its target to have the same owner. If they want to mutate, they'll have to steal and cast another of your creatures first.
-
Cleave can be pretty awkward for them at times. If you have a way to blank Cleave in hand, it can be better to block in a way to force them to tap out for it rather than block for maximum value.
| Sideboarding | |
|---|---|
| bring in | take out |
|
|
Monowhite
This matchup is suprisingly good as well. The scariest card in their deck is
The reason this matchup is good for you is because they don't present a particularly fast clock and have trouble interacting with you. In game one the only interaction they have is
Beyond that, the rest of their removal all comes at sorcery speed. You can either mutate above Goldspan Dragon to play around Chop Down or below to play around Apparition. However, getting apparitioned isn't even that bad because you'll get back a gigantic Illusion token (you get the sum of the mana values of the exiled cards), onto which you can then mutate again. Vadrok lines up well in this matchup. It blocks
| Sideboarding | |
|---|---|
| bring in | take out |
|
|
Rogues
This matchup is also surprisingly good for you. It's very awkward to play from the Rogues side. You have enough removal that it's very hard for them to make any progress attacking you or your library, so they have to try to grind. Grinding is pretty hard for them though because they can't ever tap out and it's really hard to resolve
| Sideboarding | |
|---|---|
| bring in | take out |
|
|
Sultai Ultimatum
It seems like the main way you lose this matchup is to stuff like
| Sideboarding | |
|---|---|
| bring in | take out |
|
|
Gruul Adventures
In game one they pretty much have no interaction and Spikefield Hazard answering
| Sideboarding | |
|---|---|
| bring in | take out |
|
|
Temur
This is another matchup where you want to fight over 1/1s instead of trying to kill Lovestruck Beast. Historically this strategy has not worked against these sorts of decks because of
| Sideboarding | |
|---|---|
| bring in | take out |
|
|
Izzet Dragons
Here you're fairly close to playing the same deck postboard, but trade some interaction for a combo-value finish. In game one that difference is more pronounced. This matchup is the main reason for the sideboard
| Sideboarding | |
|---|---|
| bring in | take out |
|
|
The Conclusion
Although the deck is quite good, it is also fairly difficult, so don't beat yourself up if you perform below your own expectations at first. The deck being a known quantity in full force will lead to people playing better against it and adapting their sideboards. However, I'd expect that process to take longer than the process to learn to play the deck to a proficient level.
Special thanks again to Tristan for providing me with the extensive notes that made this article possible!
Until next time,
Kristof
Opinions expressed in this article are those of the author and not necessarily Cardmarket.